a9s Data Services Installation
System Overview
The system landscape is divided into different BOSH deployments:
| BOSH Deployment | Description |
|---|---|
| a9s-billing/a9s-billing.yml | All components required to provide the a9s Billing System. |
| a9s-environment-info/a9s-environment-info.yml | All components required to provide the a9s Environment Info Service. |
| a9s-pg/a9s-pg.yml | A PostgreSQL cluster of three nodes based on the a9s PostgreSQL BOSH Release. The PostgreSQL cluster will be used as a data store by all a9s Data Service Framework components (e.g. the a9s service brokers, a9s deployers, a9s service guard, etc.). If you are going to deploy the anynines-PaaS-deployment/cf/cf.yml the Cloud Foundry setup will also use the a9s-pg cluster (Cloud Controller and UAA will store its data there). |
| backup-service/backup-service.yml | The a9s Backup Framework takes care of the backup of all Service Instances. It is an optional component that you don't need to deploy. |
| cf-service-guard/cf-service-guard.yml | The a9s CF Service Guard observes the Consul catalog and updates Cloud Foundry App Security Groups (ASGs) as soon as something changes, so that only apps deployed into Cloud Foundry space A can access Service Instances provisioned in space A. It is an optional component that you don't need to deploy. |
| consul-dns/consul-dns.yml | An internal domain name system to resolve hostnames provided and used by the a9s Data Service Framework. While installing the a9s Data Services, you have to make these name servers available in your platform environment either via DNS delegation or by configuring these name servers into your platform directly. |
| keyvalue-service/keyvalue-service.yml | All components required to provide the a9s KeyValue Data Service. |
| mariadb-service/mariadb-service.yml | All components required to provide the a9s MariaDB Data Service (versions >= 10.6). |
| mongodb-service/mongodb-service.yml | All components required to provide the a9s MongoDB Data Service. |
| postgresql-service/postgresql-service.yml | All components required to provide the a9s PostgreSQL Data Service. |
| rabbitmq-service/rabbitmq-service.yml | All components required to provide the a9s Messaging Data Service. |
| redis-service/redis-service.yml | All components required to provide the a9s Redis®[^*] Data Service. |
More conceptional readings can be found here:
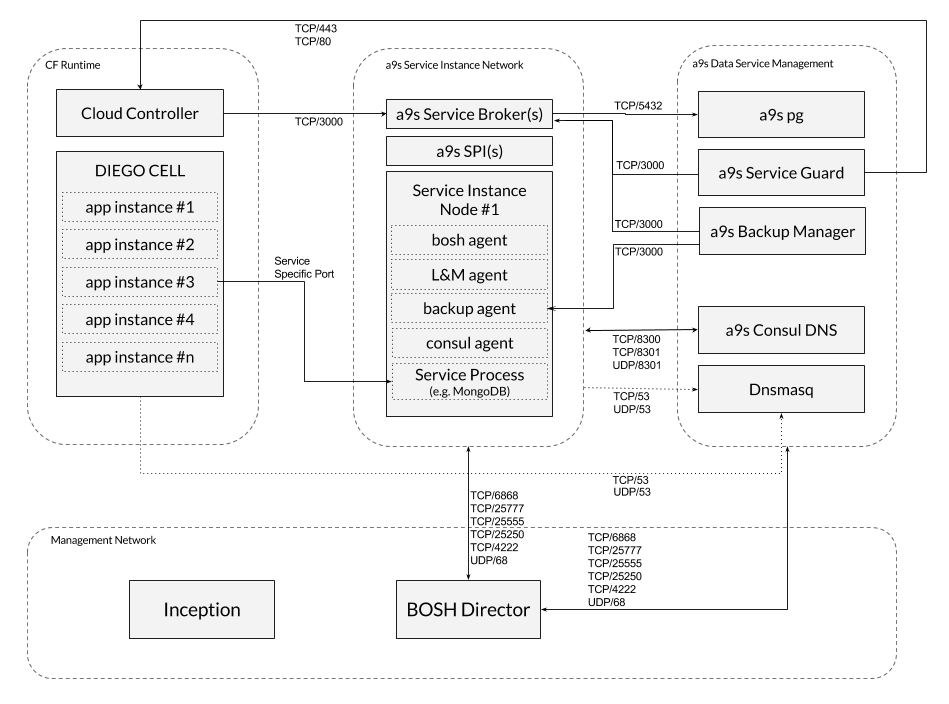
Recommended Network Layout
For a full list of Ports needed for each Data Service please take a look at the Additional Docs below or at the list of ports.
a9s Data Services Setup
If you have a Cloud Foundry setup running and you want to install the a9s Data Services follow the steps below.
0. Prerequisites
IMPORTANT: minimum required version of BOSH CLI is v2.0.36
This guides assumes that you have a BOSH director up and running and that it is configured with a BOSH 2.0 Cloud Config. In this Cloud Config, the following entities should be defined:
| Cloud Config Entry Type | Entry Names | Comment |
|---|---|---|
| azs | z1, z2, z3 | We strongly suggest to use three different Availability Zones. If you only have two or one zone, you can configure three zones in the BOSH Cloud Config anyway, and let them point to the same zones in your IaaS. We do not recommend to do this. |
| network* | dynamic, static | If you want to use different network names, you have to replace the names in the deployment manifests and in the deployer-templates. The dynamic network should be configured either as a dynamic or a manual network in the BOSH Cloud Config. Note that dynamic is only available on IaaS layers that provide a DHCP server. On OpenStack setups, manual network might cause trouble. On vSphere setups, dynamic networks might not be available. |
| vm_types | nano, small, large | If you want to configure custom service plan, you must add more VM types and refer them in config/iaas-config.yml. |
| disk_types | small, medium, large | If you want to configure custom service plan, you must add more VM types and refer them in config/iaas-config.yml. |
Please note that the default network layout does not match the recommended network layout described in chapter
Recommended Network Layout. To change the default network layout according your
requirements, you have to add the required networks to the BOSH cloud config, and also change the network names in the
deployment manifests. The default network layout will deploy the consul-dns deployment into the static network and
everything else in the dynamic network.
BOSH Director
The following BOSH Director properties must be configured accordingly.
enable_post_deploy: true
In a standard setup the BOSH Director does not run post deploy scripts by default.
Use the director.enable_post_deploy property to enable running post deploy scripts. See
https://bosh.io/docs/post-deploy/ for more
information.
use_dns_addresses: false
As this option causes update downtime among other issues on a9s Redis®, and we cannot assure
that other services work perfectly when it is enabled, use_dns_addresses must be set to
false. See use_dns_addresses for more information.
Minimum system requirements overview
The deployments are heavily tested with the following VM and disk type configurations:
Disks
| Name | Size [GB] |
|---|---|
small | 4 |
medium | 10 |
large | 30 |
VMs
| Name | CPU [Cores] | RAM [GB] | Disk [GB] |
|---|---|---|---|
nano | 1 | 1 | 4 |
small | 1 | 4 | 4 |
large | 4 | 8 | 30 |
To provide all a9s Data Services the following footprint is required (this does not include Service Instances):
| Deployments | IP count | Min Required RAM [GB] | Min Required CPU [Cores] | Disk (persistent & ephemeral) [GB] |
|---|---|---|---|---|
| Inception VM | 1 public 1 internal | 4 | 2 | 20 |
| BOSH director | 1 | 4 | 2 | 40 |
| a9s-pg | 3 | 14 | 3 | 30 |
| backup-manager | 1 | 2 | 1 | 4 |
| consul-dns | 5 | 20 | 5 | 32 |
| keyvalue-service | 4 | 4 | 3 | 12 |
| mongodb-service | 4 | 4 | 3 | 12 |
| potsgresql-service | 4 | 4 | 3 | 12 |
| rabbitmq-service | 4 | 4 | 3 | 12 |
| redis-service | 4 | 4 | 3 | 12 |
| service-guard | 4 | 16 | 4 | 16 |
| ∑ | 1 public 35 internal | 78 | 32 | 196 |
To provision an a9s Service Instance, the following resources are required for the corresponding service plan:
| Service Plan | IP count | Min Required RAM [GB] | Min Required CPU [Cores] | Disk (persistent & ephemeral) [GB] |
|---|---|---|---|---|
single-small | 1 | 2 | 1 | 8 |
single-big | 1 | 8 | 4 | 60 |
cluster-small | 3 | 12 | 3 | 24 |
cluster-big | 3 | 24 | 12 | 180 |
1. Checkout anynines-deployment
If not already done, check out this repository and change into the directory.
git clone git@github.com:anynines/anynines-deployment.git && cd anynines-deployment
2. Configure your Environment
Before you can deploy anything, you have to provide a proper IaaS configuration and also a service configuration for each service you want to deploy.
2.1 IaaS config
The IaaS config contains all information that can differ from environment to environment. The following properties are stored in the IaaS config:
- a list of supported stemcells
- Consul configuration like static IP addresses and the Consul domain
- Cloud Foundry configuration like system/app domain and static IP addresses
- a9s-pg configuration like the used stemcell, the max connections and monitoring configurations
- for each service the used stemcell and network
Have a look at config/iaas-config.yml.example
for an example and create your own IaaS config that matches your specific environment and save it as
config/iaas-config.yml. In this guide, we are going to use the config/iaas-config.yml in all following commands.
2.2 Service config
The service config is specific for each service and it contains all information about the services and plans that are provided by that specific service. There is an example config file for each service available in the config folder. Have a look at config/postgresql.yml for an example.
You can change the following parts here:
- the name of each service plan
- the GUID of each service plan
- the VM and persistent disk type of each service plan
- the migration paths for each service plan
You are also able to
- delete service plans that you don't want to provide in your setup
- add new service plans that you want to provide in your setup
Have a look at service-plans to understand how to configure service plans in the service config.
Currently it is not possible to change the configuration of the services.
3. Ensure Stemcell is Uploaded
Please see stemcells to learn more about the use of stemcells in anynines-deployment.
Ensure there is a stemcell uploaded to your BOSH director. Note that there is a different stemcell for each IaaS.
Have a look at https://bosh.io/ to find a link for your desired stemcell version.
You can then upload the stemcell version using the link provided in the previous step:
bosh upload-stemcell https://bosh.io/d/stemcells/...
4. Prepare Environment
Before starting to deploy your environment, you need to prepare your environment, this step involves creating certain variables in CredHub.
To prepare your environment, you need to execute the bin/prepare.sh inside anynines-deployment:
./bin/prepare.sh
This script generates reasonable defaults values and checks further requirements for the environment. Furthermore,
it will generate the required root CA certificates, unless they are not already present. If custom root CA certificates
should be set on the environment, the CAs needs be set in credhub before executing the prepare.sh script. For more
information about the available CAs, see Root CAs.
Depending on the local environment, the environment variable BOSH_CLI needs to be exported properly as described in
the table below.
It is possible to provide configurable options for the script via the following environment variables:
| Variable Name | Description |
|---|---|
CERT_DURATION | Duration to be used when generating new certificates. The default is 365 days. |
CREDHUB_CLI | Credhub CLI executable. The default is credhub. |
BOSH_CLI | BOSH CLI executable. The default is bosh. But in case the variable BOSH_EVIRONMENT isn't set, then the environment needs to be set with: export BOSH_CLI='bosh -e <bosh-environment>'. |
5. Deploy the a9s Consul Domain Name System
The a9s Consul DNS is a system used for service discovery within the a9s Data Services. It must be in place before deploying any a9s Data Services. To deploy the a9s Consul DNS, run:
bosh deploy -d consul-dns consul-dns/consul-dns.yml -l config/iaas-config.yml
a9s Consul DNS requires a valid Consul encryption key, which cannot be created by BOSH; thus, you must create this
key and store it to your CredHub under the key name /cdns_encrypt.
You can create and store a valid consul encryption key by executing consul keygen, and then the following command:
credhub set -n=/cdns_encrypt -w='<your_valid_encryption_key>' -t password
Please verify your consul-dns deployment before moving to the next steps. To do so, run:
bosh vms -d consul-dns
This command should produce an output similar to the following:
Using environment '192.168.50.6' as client 'admin'

Task 1113. Done

Deployment 'consul-dns'

Instance                                      Process State  AZ  IPs          VM CID                                VM Type
consul/23e80f11-3663-49b1-b08e-c3246fbea2e8   running        z1  10.244.5.15  32492afa-ed2e-448a-6c73-d8691e96d3c2  small
consul/3e9a5950-b146-4b98-9daf-b6c69b99d2ea   running        z2  10.244.6.15  b9cfbbde-4f1f-44cb-59b2-b5f7c965a2cf  small
consul/664a2a40-4a0c-4a16-a46f-4ecdf1e01f27   running        z3  10.244.7.15  06f1e485-b702-4e17-6fd0-4c151a7c36aa  small
dnsmasq/55bed760-e149-4afc-b1a4-dd0029e86145  running        z1  10.244.5.16  64ea1c82-9896-4097-6fa7-0f6e177f1f56  small
dnsmasq/8bc0f00a-609c-4df5-bba5-ac57c905cf87  running        z2  10.244.6.16  3f14f873-b576-4c2a-7149-34364230cb70  small

5 vms

Succeeded
Please ensure that each instance has the process state running. Further, pick the IP address of one of the dnsmasq
servers and try to resolve a consul hostname:
$ dig @10.244.5.16 consul.service.consul +short
10.244.5.15
10.244.6.15
10.244.7.15
If the setup works correctly, the command above should return the IP addresses of the consul nodes.
6. Make the Consul DNS Available in your platform
Ensure the applications deployed to Cloud Foundry can resolve the hostnames of consul. You can set the suffix/TLD of the
hostnames in your IaaS config under iaas.consul.domain.
To configure a DNS delegation inside your existing name server, you have to setup your name servers to delegate all DNS
queries which end with your selected suffix to the IP addresses of the dnsmasq VMs in the consul-dns deployment.
If setting up a DNS delegation inside your name server is not an option, you can also configure the IP addresses of the
dnsmasq servers in your elastic runtime so that each DNS query is first redirected to the consul-dns. The
consul-dns will redirect all queries that don't end with your selected suffix to upstream name servers.
Once the Consul DNS is available in your platform, please double check that it is possible to resolve internal (e.g.
consul.service.consul) hostnames as well as external hostnames. Perform this check in each AZ and each
isolation segment of your platform.
7. Deploy a9s-pg
All a9s Data Service Framework components require this PostgreSQL Cluster to store their state.
You must pay attention to the a9s-pg max_connections configuration, by default the
a9s PostgreSQL BOSH release calculates max_connections based on the size of
shared_buffers and work_mem, but when deploying a9s-pg you might wanna use
a higher value, that better reflects the usage of the services. To configure
this parameter, use the iaas.a9s_pg.max_connections property in your IaaS File.
To deploy it, simply execute:
$ bosh deploy -d a9s-pg a9s-pg/a9s-pg.yml -l config/iaas-config.yml
Starting with anynines-deployment v60.0.0, a9s-pg is using a9s PostgreSQL 15 by default and it's not possible to continue a9s-pg running on a9s PostgreSQL 11. Therefore, a9s-pg must be manully upgraded to use a9s PostgreSQL 15 before executing the update to anynines-deployment v60.0.0. Otherwise, a forcefully upgrade of a9s-pg could be triggered that could lead to data loss and misbehaviour.
To execute a major version upgrade of a9s-pg, please refer to the a9s-pg Major Upgrade page for more details.
You can also use the a9s dfs-helpers scripts to trigger backups and restore, to know more about this see the documentation here.
7a. Post-deployment Process
In order to perform an a9s-pg disaster recovery if necessary, the platform operation must retrieve and save obligatorily the backup encryption key and the Backup Manager Service Instance id. In case, the disaster recovery happens and this information is unknown, it is not possible to recovery the a9s-pg anymore. Read the a9s-pg Manual Logical Backup Recovery section to know more about it.
7b. Setup Monitoring for a9s-pg
In order to detect issues in your a9s-pg cluster without allowing them to spread or escalate, you should setup monitoring. It is possible to add monitoring to your a9s-pg cluster by following a9s-pg setting up metrics manual. This should help you better understand the cluster's health and performance.
8. Deploy a9s Data Services
This step demonstrates how to deploy the a9s PostgreSQL Data Service. You can repeat this step for each service you want to install.
8a. Update BOSH director configuration
It is required that the a9s Deployer can access a BOSH director in order to be able to provision Service Instances. Therefore, you have to configure the BOSH director credentials into the deployment manifest.
The first step to do so, is to get the following credentials from the BOSH
director's creds.yml file and store them in your CredHub:
deployer_director_environment: this value has the BOSH director's IP address. It is a single string valuedeployer_director_ca_cert: this value has the BOSH director's CA certificate. It is a certificate-type valuedeployer_director_client: this value has the BOSH director's username and password. It is a user-type value, meaning that the username and password can be accessed as follows,((/deployer_director_client.username))and((/deployer_director_client.password))
The values can be set in CredHub by executing the following commands:
credhub set --type value --name '/deployer_director_environment' --value <BOSH_IP_ADDR>
credhub set --type certificate --name '/deployer_director_ca_cert' --certificate <(bosh int ./creds.yml \
  --path /director_ssl/ca)
credhub set --type user --name '/deployer_director_client' -w $(bosh int ./creds.yml --path /admin_password) -z 'admin'
8b. Deploy Components
Deploy via:
bosh deploy -d postgresql-service postgresql-service/postgresql-service.yml -l config/iaas-config.yml \
  -l config/postgresql.yml
Don't forgot to add -l config/postgresql.yml in the command above.
8c. Upload a9s Deployer Templates
The a9s Deployer is the component that talks with the BOSH director and creates BOSH deployments. In order to do this, this components needs templates of BOSH deployment manifests. There are templates for each a9s Data Service available.
Each service provides an errand called templates-uploader, this errand encapsulates this templates and uploads them to
a9s Deployer.
After deploying the service, you can execute the errand with the following command:
bosh -d <deployment-name> run-errand templates-uploader
E.g.:
bosh -d postgresql-service run-errand templates-uploader
8d. Create Service Broker in Cloud Foundry
In order to make the a9s-postgresql service offering available in a Cloud Foundry marketplace execute the following commands as a Cloud Foundry admin:
cf create-service-broker a9s-postgresql-broker admin [password] http://postgresql-service-broker.service.dc1.consul:3000
cf enable-service-access a9s-postgresql15
For PostgreSQL, the key for getting the password looks like this: /postgresql_service_broker_password. You can get it
with credhub get -n /postgresql_service_broker_password when using CredHub.
8e. Run Service Smoke Tests to Validate your Setup
For each a9s Data Service, there is an errand smoke-tests included. This errand
verifies that the main a9s Data Service features work in your environment.
For more information, please take a closer look at the Smoke Tests documentation.
$ bosh -d postgresql-service run-errand smoke-tests
Depending on how you have configured your Cloud Foundry ASGs, you first must deploy the a9s CF Service Guard otherwise the smoke tests will fail.
9. Deploy a9s CF Service Guard (optional)�
Deploying the a9s CF Service Guard is optional, but if you don't deploy the a9s CF Service Guard you have to create a global Cloud Foundry ASG which whitelists the whole network where the Service Instances are deployed to.
Deploying the a9s CF Service Guard
To deploy the a9s CF Service Guard side by side with the a9s PostgreSQL service run
bosh -d cf-service-guard deploy cf-service-guard/cf-service-guard.yml -l config/iaas-config.yml \
  -o cf-service-guard/ops/add-postgresql.yml
If you are using also other services than the a9s PostgreSQL Service you have to add the corresponding Ops file to the command above.
Once the deployment of the a9s CF Service Guard is finished, you should see a Cloud Foundry ASG for each Service Instance existing in the corresponding Cloud Foundry space.
$ cf security-groups
Getting security groups as admin
OK

     Name                                           Organization   Space
#0   services
#1   public_networks
#2   dns
#3   a9s-asg-34f22bce-d540-46c0-9efd-8bf293ad0a95   anynines       test
#4   a9s-asg-933c47ba-e3fc-4b00-9549-6fd8f323f3ca   anynines       test
The security group are prefixed by default with a9s-asg- and suffixed with the guid of the Service Instance.
Whitelist the Services Network
In case you don't use the cf-service-guard you have to whitelist the whole services network. Otherwise cf pushed apps
won't be able to access Service Instances. While this is useful for development and testing purposes it is not
recommended for production systems.
Have a look at your IaaS config (e.g. config/iaas-config.yml) and note down the subnets where Service Instances will
be created.
Check the currently active security groups via cf security-groups. Check the currently active services security group
via cf security-group services. If what you see doesn't fit the subnets from the IaaS config you have to adjust them.
The following example refers to the BOSH-lite IaaS settings.
Create a file (security-group-services.json) with the following content:
[
  {
    "destination": "10.244.10.1-10.244.10.254",
    "protocol": "all"
  },
  {
    "destination": "10.244.11.1-10.244.11.254",
    "protocol": "all"
  },
  {
    "destination": "10.244.12.1-10.244.12.254",
    "protocol": "all"
  }
]
Update the existing security group via
cf update-security-group services security-group-services.json
Check whether the security group services is active via cf running-security-groups. If it is not listed there you
have to bind it via
cf bind-running-security-group services
10. Deploy a9s Backup Service (optional)
Deploying the a9s Backup Service is optional, but if you don't deploy the a9s Backup Service you won't have backups of Service Instances or a9s-pg!
In order to monitor backups of Service Instances and a9s-pg we deploy a9s Backup Monit as part of the a9s Backup Dervice. a9s Backup Monit is described in more detail in a9s Backup Monit Metrics.
To deploy the a9s Backup Service side by side with the a9s PostgreSQL service run
bosh deploy -d backup-service backup-service/backup-service.yml -o ops/add_broker_to_backup_service/postgresql.yml \
  -l config/iaas-config.yml
10a. Use AWS S3 as backup store
In order to use AWS S3 as backup store, you have to configure the following variables in CredHub:
| Variable name | Description |
|---|---|
/backup_access_key | The AWS access key |
/backup_secret_access_key | The AWS secret key |
/backup_bucket | The AWS bucket name |
/backup_region | The AWS region where the bucket is |
bosh deploy -d backup-service backup-service/backup-service.yml -o ops/add_broker_to_backup_service/postgresql.yml \
  -l config/iaas-config.yml
While the a9s Backup Framework supports AWS S3 as a backup store, this does not extend to every AWS S3 Storage Class.
Currently, the supported AWS S3 storage class is S3 Standard.
10b. Use Azure Blob Storage as backup store
In order to use Azure Blob Storage as backup store, you have to deploy with the backup-on-azure.yml ops file and configure the following variables in CredHub:
| Variable name | Description |
|---|---|
/azure_storage_access_key | The Azure storage access key |
/azure_storage_account_name | The Azure storage account name |
/azure_container | The Azure container name |
bosh deploy -d backup-service backup-service/backup-service.yml -o ops/add_broker_to_backup_service/postgresql.yml \
  -o ops/backup-on-azure.yml -l config/iaas-config.yml
10c. Use Aliyun Object Storage Service as backup store
In order to use Aliyun Object Storage Service as backup store, you have to deploy with the backup-on-alicloud.yml ops file and configure the following variables in CredHub:
| Variable name | Description |
|---|---|
/aliyun_accesskey_id | The Aliyun Object Storage Service access key ID |
/aliyun_accesskey_secret | The Aliyun Object Storage Service access key secret |
/aliyun_oss_bucket | The Aliyun Object Storage Service container name |
/aliyun_oss_location | The Aliyun Object Storage Service location |
/aliyun_oss_endpoint | The Aliyun Object Storage Service endpoint |
bosh deploy -d backup-service backup-service/backup-service.yml -o ops/add_broker_to_backup_service/postgresql.yml \
  -o ops/backup-on-alicloud.yml -l config/iaas-config.yml
10d. Use a Generic S3 API
In order to use a generic S3 API as backup store, you have to deploy with the backup-on-generic-s3.yml ops file and configure the following variables in CredHub:
| Variable name | Description |
|---|---|
/generic_s3_access_key_id | The generic S3 API access key |
/generic_s3_secret_access_key | The generic S3 API secret key |
/generic_s3_bucket | The generic S3 API bucket name |
/generic_s3_region | The generic S3 API region where the bucket is |
/generic_s3_endpoint | The generic S3 API endpoint |
/generic_s3_path_style | The generic S3 API path style |
bosh deploy -d backup-service backup-service/backup-service.yml -o ops/add_broker_to_backup_service/postgresql.yml \
  -o ops/backup-on-generic-s3.yml -l config/iaas-config.yml
9d. Deploy Without a9s Backup Monit
There is an ops file which removes the a9s Backup Monit component backup-service-without-backup-monit.yml.
bosh deploy -d backup-service backup-service/backup-service.yml -o ops/backup-service-without-backup-monit.yml \
  -l config/iaas-config.yml
Known Limitations of a9s Backup Service
-
If you are using also other services than the a9s PostgreSQL Service you have to add the corresponding Ops file to the command above. The individual Ops files to add the service specific a9s Service Brokers to the configuration can be found here.
-
The a9s Backup Manager components are NOT horizontally scalable, so it is not possible to increase the amount of VMs.
-
The
backup_manager_encryption_keyparameter must be a string with a minimum of 32 characters (when using CredHub, the resulting value will compliant to this requirement). -
In the case of a9s Search:
- The backup process is based on OpenSearch Snapshot functionality, this means that:
- Backups are not encrypted.
- Due to this, the
backup_manager_encryption_keyproperty cannot be set.
- Due to this, the
- Backups cannot be downloaded.
- The storage backend is limited to AWS S3 and Azure; generic S3 API services are not supported.
- Backups are not encrypted.
- OpenSearch's default filter plugins are not available.
- The backup process is based on OpenSearch Snapshot functionality, this means that:
11. Deploy a9s Environment Info (optional)
With the a9s Environment Info service, a9s deployments provides a way to serve static information.
The endpoints can be configured in your IaaS config (e.g. config/iaas-config.yml).
bosh deploy -d a9s-environment-info a9s-environment-info/a9s-environment-info.yml -l config/iaas-config.yml
- Once the a9s Environment Info service is deployed you can use it to get a list of all service brokers, see example below (This API does not require any authorization).
- You can modify the output of this service by manipulating the IaaS-config accordingly.
- Mind to adapt the Service Broker URLs in the IaaS-config according to your chosen consul domain.
$ curl <a9s environment info host/ip>:3000/service_brokers | jq '.'
[
  {
    "service_description": "This is a service broker creating and managing dedicated MongoDB instances, powered by the
    anynines Service Framework",
    "service_name": "a9s-mongodb",
    "url": "http://mongodb-service-broker.service.dc1.consul:3000"
  },
  {
    "service_description": "This is a service broker creating and managing dedicated PostgreSQL Service Instances and clusters, powered by the anynines Service Framework",
    "service_name": "a9s-postgresql",
    "url": "http://postgresql-service-broker.service.dc1.consul:3000"
  },
  {
    "service_description": "This is a service broker creating and managing dedicated Redis® Service Instances, powered by the anynines Service Framework",
    "service_name": "a9s-redis",
    "url": "http://redis-service-broker.service.dc1.consul:3000"
  },
  {
    "service_description": "This is a service creating and managing dedicated RabbitMQ Service Instances, powered by the anynines Service Framework",
    "service_name": "a9s-rabbitmq",
    "url": "http://rabbitmq-service-broker.service.dc1.consul:3000"
  },
]
12. Deploy a9s Billing (optional)
The a9s Billing system can be used for two use cases:
- Observe the Service Instance usage via timeseries
- Create invoices based on price plans and platform usage data
To deploy the a9s Billing system for the first use case, run:
bosh deploy -d a9s-billing a9s-billing/a9s-billing.yml -o a9s-billing/ops/add_grafana.yml \
  -o a9s-billing/ops/grafana_dashboard_data_services.yml -o a9s-billing/ops/add_grafana_route.yml \
  -o a9s-billing/ops/add_a9s_invoices.yml -l config/iaas-config.yml
- The
a9s-billing/ops/add_grafana.ymlopsfile adds an instance group which runs grafana. - The
a9s-billing/ops/add_a9s_invoices.ymlopsfile adds an instance group which runs a rudimentary invoice subsystem. - The
a9s-billing/ops/grafana_dashboard_data_services.ymlopsfile configures grafana with a default dashboard to visualize Data Service usage. - The
a9s-billing/ops/add_grafana_route.ymlopsfile, adds a route to the gorouter so that grafana can be accessed the same way the CF API can be accessed.
You can access the statistics using the following credentials:
SYSTEM_DOMAIN=`bosh int config/iaas-config.yml --path /iaas/cf/system_domain`
GRAFANA_URL="https://a9s-billing-dashboard.${SYSTEM_DOMAIN}"
GRAFANA_USER=admin
GRAFANA_PASSWORD=`credhub get -n /bosh-lite/a9s-billing/grafana_password`
Open the GRAFANA_URL in your browser and access the value from GRAFANA_USER and GRAFANA_PASSWORD in the browser.
It can take up to one day before you see the usage of Data Service instances in grafana.
13. Enable Non-GA Services
By default, each a9s Data Service's manifest only contains the corresponding GA services. Release candidates, services in the beta phase, and deprecated services are not contained and must be enabled explicitly via the corresponding Ops-file.
Be advised that enabling Non-GA services may have some implications. For more information, see a9s Data Service Sunrise/Sunset for Major Versions.
13.1. Enable Release Candidates Services
To enable a release candidate (RC) for a particular a9s Data Service, you have to apply the corresponding Ops-file for
that specific service version, which can be found under
ops/enable_rc_services/<data_service_name>-<version_number>.yml.
13.2. Enable Beta Services
To enable a service in the beta release phase for a particular a9s Data Service, you have to apply the corresponding
Ops-file for that specific service version, which can be found under
ops/enable_beta_services/<data_service_name>-<version_number>.yml.
14. Plan Updates
The a9s Data Service Instances support updates from smaller to bigger plans but not vice versa.
Examples:
postgresql-single-smalltopostgresql-single-bigpostgresql-replica-smalltopostgresql-replica-bigpostgresql-single-smalltopostgresql-replica-smallpostgresql-single-smalltopostgresql-replica-big
The following a9s Data Services do not support plan updates from single to cluster:
- a9s MongoDB 3.2
- a9s PostgreSQL 9.4
The following a9s Data Services do not support plan updates from the non-ssl plan to the ssl plan:
- a9s MariaDB
Known Issues
- At the moment you cannot deploy the Data Service Framework without having Cloud Foundry deployed before.
- The data center component of a Consul DNS name must not be empty or contain a
"."(dot). It should not be changed from the defaultdc1. We are working on eliminating these requirements.
Additional Docs
*Redis is a registered trademark of Redis Ltd. Any rights therein are reserved to Redis Ltd. Any use by anynines GmbH is for referential purposes only and does not indicate any sponsorship, endorsement or affiliation between Redis and anynines GmbH.